Kubernetes Complete Course
1. What is Kubernetes (K8s)?
Kubernetes is a system that helps you run, manage, and scale applications using containers (like Docker).
👉 Think of it as a manager of many computers (nodes) that run your app automatically.
- Automatic Scaling: Automatically increases or decreases Pods based on traffic. (More users → more pods created automatically)
- Self-Healing: Restarts crashed containers, replaces failed Pods, and keeps your app always running.
- Load Balancing: Distributes traffic evenly across Pods preventing overload, resulting in better performance.
- Easy Deployment and Updates: Supports zero-downtime rolling updates and easy rollbacks.
- Service Discovery and Networking: Provides built-in DNS so Pods can communicate via Service names (no manual IP management).
- Configuration and Secret Management: Keeps code clean and secure using ConfigMap for settings and Secret for sensitive data.
- Efficient Resource Utilization: Schedules workloads on the best available node, saving costs in cloud environments.
- Cloud Agnostic: Works anywhere (AWS, Azure, Google Cloud, on-premise) with no vendor lock-in.
- High Availability: Runs multiple replicas so if one fails, the others continue running, ensuring system uptime.
- Microservices Friendly: Ideal for modern applications and managing decoupled services easily.
- Declarative Configuration: Define desired state in YAML files, and Kubernetes maintains it. (e.g., "I want 3 pods" → always keeps 3 running)
- Automation: Automates deployments, scaling, and recovery, significantly reducing manual DevOps effort.
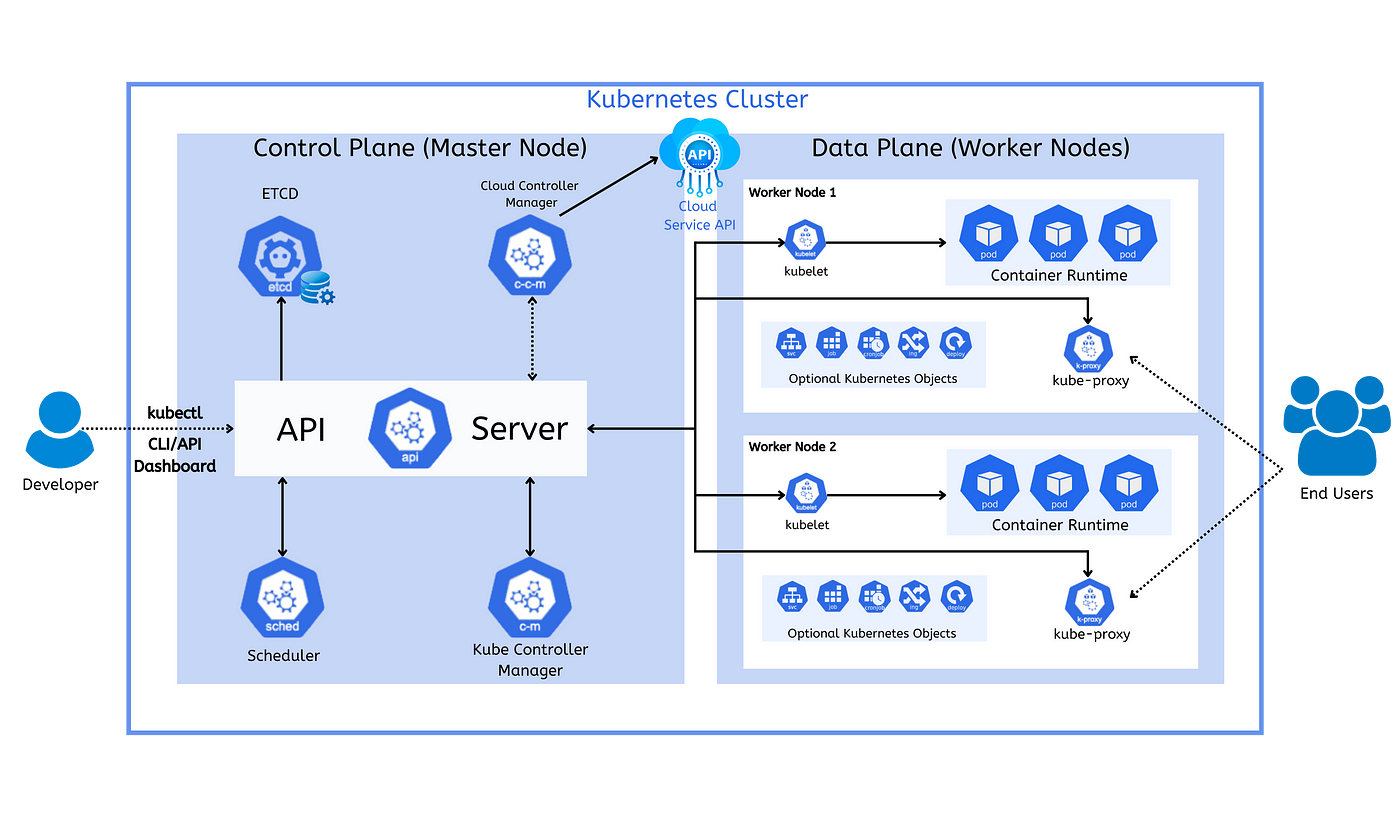
2. Overall Structure
Kubernetes is divided into 2 main parts:
- Control Plane (Master Node): Brain of the system (makes decisions)
- Data Plane (Worker Nodes): Actual workers (run your applications)
3. Control Plane (Master Node)
This part controls everything.
- Entry point of Kubernetes
- All commands go through here (`kubectl`, UI, etc.)
- Talks to all components
kubectl create podIt goes to API Server first
- Database of Kubernetes
- Stores cluster data (pods, nodes, configs)
- Key-value storage
Everything about the cluster is saved here
- Decides which worker node will run your pod
- Checks CPU, Memory, Availability
Example: If Node 1 is free → place pod there
- Keeps system in desired state
- Fixes problems automatically
Example: If pod crashes → it creates a new one. If you want 3 pods → ensures always 3 running
- Connects Kubernetes with cloud providers (AWS, Azure, etc.)
- Manages load balancer, storage, networking
4. Data Plane (Worker Nodes)
These are the machines where your apps actually run.
- Agent running on each worker node
- Talks to API Server
- Ensures containers are running
API says run pod → kubelet starts it
- Software to run containers (Examples: Docker, containerd)
- Responsible for: Pulling images, Running containers
- Smallest unit in Kubernetes
- Contains one or more containers
Your app runs inside a pod
- Handles networking
- Routes traffic to correct pods
User request → kube-proxy → correct pod
- Services, Deployments, ConfigMaps
- Help manage and expose your app
5. How Everything Works (Flow)
- You send command using
kubectl - → Goes to API Server
- → Stored in ETCD
- → Scheduler selects worker node
- → Kubelet runs pod on that node
- → Container runtime starts container
- → Kube-proxy handles traffic
Kubernetes Core Objects
Definition: Smallest deployable unit in Kubernetes.
- Contains one or more containers
- Shared network & storage
- Usage: Runs your application
apiVersion: v1              # API version for Pod
kind: Pod                  # Resource type
metadata:
  name: my-pod             # Name of the Pod
spec:
  containers:
    - name: my-container   # Container name inside Pod
      image: nishan023/my-app:01         # Docker image to run
      ports:
- containerPort: 80 # Exposes port 80 inside containerDefinition: A way to expose Pods so they can be accessed.
Why needed: Pods change IP when restarted, Service provides stable IP/DNS.
- ClusterIP: internal
- NodePort: external via port
- LoadBalancer: cloud access
apiVersion: v1
kind: Service              # Exposes Pods
metadata:
  name: my-service         # Service name
spec:
  selector:
    app: my-app            # Selects Pods with this label
  ports:
    - protocol: TCP        # Network protocol
      port: 80             # Service port (external)
      targetPort: 80       # Pod container port
type: NodePort # Makes service accessible from outside clusterDefinition: Manages external HTTP/HTTPS access to services based on URL routing.
Usage: Routing based on URL/path. Why use: No need multiple ports, works like smart router.
apiVersion: networking.k8s.io/v1
kind: Ingress              # Manages external HTTP/HTTPS access
metadata:
  name: my-ingress
spec:
  rules:
    - host: example.com    # Domain name
      http:
        paths:
          - path: /        # URL path
            pathType: Prefix
            backend:
              service:
                name: my-service  # Target service
                port:
number: 80 # Service portDefinition: Stores non-sensitive configuration data
Usage: Pass config to Pods without changing code
apiVersion: v1
kind: ConfigMap            # Stores non-sensitive config
metadata:
  name: my-config
data:
  APP_MODE: production     # App environment setting
DB_HOST: localhost # Database hostDefinition: Stores sensitive data securely (Passwords, API keys, Tokens)
Usage: Inject into Pods safely. More secure than ConfigMap.
apiVersion: v1
kind: Secret               # Stores sensitive data
type: Opaque               # Generic secret type
metadata:
  name: my-secret
data:
  username: YWRtaW4=       # base64 encoded 'admin'
password: cGFzc3dvcmQ= # base64 encoded 'password'Definition: Manages Pods automatically (healing, rolling updates, scaling).
What it does: Creates Pods, Scales Pods, Updates Pods. If you want 3 pods → Deployment ensures always 3 running.
apiVersion: apps/v1
kind: Deployment           # Manages Pods automatically
metadata:
  name: my-deployment
spec:
  replicas: 3              # Number of Pod copies
  selector:
    matchLabels:
      app: my-app          # Matches Pods with this label
  template:
    metadata:
      labels:
        app: my-app        # Label applied to Pods
    spec:
      containers:
        - name: my-container
          image: nishan023/my-app:01     # Container image
          ports:
            - containerPort: 80
Final Relationship Summary
- Deployment → manages → Pods
- Pod → runs app
- Service → exposes Pods
- Ingress → routes traffic
- ConfigMap → provides config
- Secret → provides secure data
Simple Analogy
| Component | Meaning |
|---|---|
| Pod | Worker |
| Deployment | Manager |
| Service | Contact number |
| Ingress | Main gate/router |
| ConfigMap | Settings file |
| Secret | Password locker |
Persistent Volume (PV) & Claim (PVC)
Pods are temporary. If a Pod restarts or gets deleted, all data inside it is lost. We use PV and PVC to store data permanently.
- PV (Persistent Volume): Actual physical storage disk in the cluster. Exists independent of Pods.
- PVC (Persistent Volume Claim): A request from a developer for storage (size, access mode).
Relationship (Very Important): Pod → PVC → PV → Physical Storage
How It Works (Simple Explanation)
- Step 1: PVC is created and requests storage ("I need 1GB storage")
- Step 2: Kubernetes finds a matching PV
- Step 3: PVC gets bound to PV
- Step 4: Pod uses PVC as a volume
- Step 5: Data is stored in PV (not inside Pod)
apiVersion: v1
kind: PersistentVolume
metadata:
  name: my-pv
spec:
  capacity:
    storage: 1Gi
  accessModes:
    - ReadWriteOnce
  hostPath:
path: /data/storageapiVersion: v1
kind: PersistentVolumeClaim
metadata:
name: my-pvc
spec:
accessModes:
- ReadWriteOnce
resources:
requests:
storage: 1GiapiVersion: apps/v1
kind: Deployment
metadata:
name: my-app
spec:
replicas: 1
selector:
matchLabels:
app: my-app
template:
metadata:
labels:
app: my-app
spec:
containers:
- name: my-container
image: nishan023/my-app:01
volumeMounts:
- mountPath: /app/data
name: my-storage
volumes:
- name: my-storage
persistentVolumeClaim:
claimName: my-pvcWhy PV & PVC are Important
| Without PV/PVC | With PV/PVC |
|---|---|
| Data lost on restart | Data persists |
| Not reliable | Production ready |
| Temporary storage | Permanent storage |
Access Modes
| Mode | Description |
|---|---|
| ReadWriteOnce | One Pod can write |
| ReadOnlyMany | Many Pods can read |
| ReadWriteMany | Many Pods can write |
Key Points
- Pods are temporary
- PV provides storage
- PVC requests storage
- Data remains even if Pod is deleted
Real Example (MongoDB)
MongoDB stores data in:
/data/dbKubernetes (Minikube + kubectl) Complete Guide (Practical)
Minikube is a tool that runs a local Kubernetes cluster on your computer. Used for learning and testing locally.
kubectl is a command-line tool used to interact with Kubernetes. It helps you create resources, manage pods, and debug.
1. Installation Commands
| Command | Description |
|---|---|
| Allows script execution in PowerShell |
| Installs Minikube using Chocolatey |
| Starts Kubernetes cluster using Docker |
| Deletes the cluster |
| Shows cluster status |
2. Basic Kubernetes Concepts
| Component | Description |
|---|---|
| Pod | Smallest unit in Kubernetes (runs container) |
| Deployment | Manages multiple pods |
| Service | Exposes pods to network |
| ConfigMap | Stores non-sensitive config data |
| Secret | Stores sensitive data (passwords, keys) |
| Ingress | Manages external HTTP access |
3. Basic kubectl Commands
| Command | Function |
|---|---|
| List all running pods |
| List deployments |
| List services |
| Show all resources |
| Detailed pod info |
| Show container logs |
4. Deployment Commands
| Command | Function |
|---|---|
| Create deployment |
| Apply YAML config |
| Delete deployment |
| Delete resources from YAML |
| Update image |
| Check update status |
| Rollback deployment |
| Scale pods |
5. Service Commands
| Command | Function |
|---|---|
| Expose app |
| Delete service |
| View services |
| Open app in browser |
6. Working with YAML Files
| Command | Function |
|---|---|
| Create resources |
| Delete resources |
| Deploy web app |
| Apply secrets |
| Apply config |
7. Debugging Commands
| Command | Function |
|---|---|
| Check pod status |
| View logs |
| Debug issues |
8. Minikube Commands
| Command | Function |
|---|---|
| Open GUI dashboard |
| Access service |
| Start cluster |
| Delete cluster |
9. Example Workflow (Step-by-Step)
minikube start --driver=dockerkubectl apply -f mongo-config.yaml
kubectl apply -f mongo-secret.yaml
kubectl apply -f mongo.yaml
kubectl apply -f web.yamlkubectl get podskubectl expose deployment webapp --type=LoadBalancer --port=3000minikube service webapp-service10. Example Secret (MongoDB)
apiVersion: v1
kind: Secret
metadata:
  name: mongo-secret
type: Opaque
data:
  mongo-user: bW9uZ291c2Vy
  mongo-password: bW9uZ29wYXNzd29yZA==
11. Key Notes
- Use
---to separate multiple YAML configs - Apply Deployment first, then Service
- Use Services for communication between pods
- Keep terminal open when using Minikube service
Final Summary
| Tool | Purpose |
|---|---|
| Minikube | Runs local Kubernetes cluster |
| kubectl | Manages Kubernetes resources |